Difference between revisions of "My Media Library"
(→Hotspots / Overlays) |
m (→Publishing) |
||
| Line 27: | Line 27: | ||
== Publishing == | == Publishing == | ||
| − | You have | + | You have two ways of granting other people access to your videos in learnIT Media. Either you add people to the actual video by using the [[LearnIT_Media/Editing_an_Entry#Collaboration|Collaboration]] tab or you can publish your video to one of your courses or a Shared Repository. |
=== Publish to course === | === Publish to course === | ||
Revision as of 13:06, 22 June 2021
This help section will be expanded upon during the next couple of weeks and months. If you have specific questions not answered here, please contact learning@itu.dk
Contents
My Media Library
The learnIT Media library is the main way for you to interact with your video library. It contains all videos you have access to, whether you are the owner of the video, a co-collaborate or the video has been shared with you for viewing only - your affiliation with any given video is displayed to you on each video entry as well as its published state: Private or Published. Private meaning the video is only accessible to you and potential co-creators/viewers and Published meaning it has been published to a Course and students have access to the video.
From the overview, you are able to search or use filters in order to drill down and locate your specific videos based on many different criteria. Once located, you are able to easily edit the entry/entries, delete it/them, or publish to courses.
NOTE: Are you missing videos that you had access to on VidGrid? Videos that were shared with you do not always automatically show up in LearnIT Media. Click here to read more about how to fix this.
Editing an Entry
You can edit any entry that you are the owner of, and any video that you are a collaborator on. By clicking on the pencil-icon next to a video you can update a range of settings. There are eight different tabs with settings:
Upload & Record
When you want to add a new video to LearnIT you have different ways of doing so. If you have a video file ready you can simply upload it. But when you're about to record a video LearnIT Video has a variety of tools you can also use to do this.
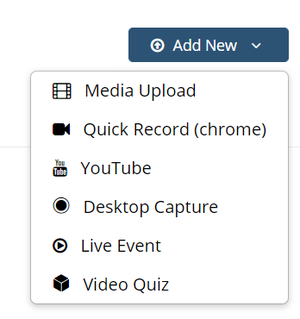
Adding new videos is done by clicking the "Add New" button from your media library and selecting the method you need.
- Media Upload is a straight forward upload, where you can upload a video file (a MP4, MOV, AVI etc.) from your computer.
- Desktop Capture allows you to use the "Kaltura Capture" software package to record your webcam and/or screen directly on your computer. With some advanced features, such as the opportunity to allow viewers to see both your webcam and screen recording at the same time.
- Quick Record allows you to record simple videos without leaving your browser, please note that this currently only works in Google Chrome.
Publishing
You have two ways of granting other people access to your videos in learnIT Media. Either you add people to the actual video by using the Collaboration tab or you can publish your video to one of your courses or a Shared Repository.
Publish to course
Select a video from your Media Library using the checkbox to the left of the video and select Actions > Publish.
If the video is private, you will have to select Published. Now a list of all your courses appear. Search for the course you want to publish the video to. This list might be fairly long, so use CTRL+F or COMMAND+F to search for the course. Once you have selected a course or several courses, hit save and the video will appear in that/those course(s)' Course Media area.
It is a requirement to select who is featured in the video before you can publish a video; (Teachers, Students, Student (only), Guest lecturers and/or other. You will be asked to fill out this information when uploading a video, but can also choose to fill it out later by editing the details of the video.
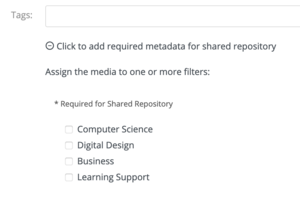
Shared Repositories is a way to share videos that might be usable for other colleagues and courses at the ITU. In order to start sharing a video, you have to select a category for the video and the categories are divided into the various educational tracks at ITU; Computer Science, Data Science, Business and Digital Design. You need to edit the details of your video and add it to the category of your choosing.
Once you have added the video to a category, choose save, and select Shared Repository from the Publishing interface. (For details look at Publishing Videos
Please make sure to only share videos featuring yourself or people that have allowed you to share the video. Videos containing students should never be shared in a shared repository.
The Video Editor (Launch Editor)
LearnIT Media has an included basic video editor. It is not meant for sophisticated editing workflows, rather it is an easy way to trim and edit out a few sections from your already recorded video.
The video editor has the following functions:
- Setting start (in) and endpoint (out) of a video
- Splitting a video and setting multiple start and endpoints, which removes areas between the various segments
- Adding a fade in/out to the video segments
- Saving as a new clip or overwriting the original video
The timeline view enables you to see a preview of the video content as well as a waveform for the audio. Using the waveform as a guide for trimming your video is a great and quick way of locating silent areas that might need to be edited out.
Quiz
You can easily add questions to a video uploaded to your learnIT Media Library. You can determine at what point to pause the video and ask a question and set various quiz options.
To get started the video must be in your learnIT Media Library. You can start creating the quiz either in your learnIT Media Library or on the Course Media section of a specific course, but for simplicity we recommend starting the quiz in your own media Library.
- Go to My Media Library on learnIT and click Add New -> Video Quiz
- Search for the video you want to add a Quiz to or upload a new video and click Select.
- When you start creating the quiz a copy will be made so you are not altering the original clip.
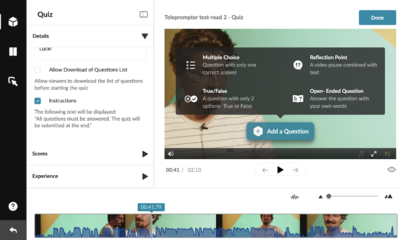
- Be sure to look through the various options especially under the details section. By default students can download a list of questions ahead of time, and go back and change answers and skip questions. Depending on how you want to set up the quiz, you may want to change these settings.
- To add questions, use the timeline at the bottom to go to the point in the video where you want the question to appear and click Add a Question. The options are Multiple Choice, True/False, Open Ended, and Reflection Point (which is not an actual question, but a text popup).
- Click Done when you are finished.
Hotspots / Overlays
Hotspots and overlays is a way to augment a video with text boxes, links to websites, and links to other parts of the same video.
In order to create overlays for a video, you need to select your video in you media library, click the Actions menu and click on "Launch Editor". From here, you need to click the Hotspot icon (![]() ) to start creating hotspots.
) to start creating hotspots.
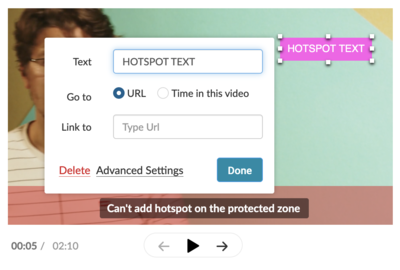
Via the timeline at the bottom, locate a position for your label (text box). Click the area of the video where the label should appear and type some text you want to include. On the timeline, you can drag the end point of the label in order for the label to disappear after a given amount of time. Optionally, you can add a URL or a timecode to the label - if you do not, the label only serve as an unclickable label on top of the video. You also have the option to customize the appearance of the label, such as background color, font size, border radius, etc. by opening the Advanced Settings.
Please note that you cannot add hotspot labels to the lower part of your video. This area is reserved for play controls and subtitles.
Once you have added as many Hotspots as you require, simply hit save and the hotspots are active on your video.


